Interaction with the deployment on a specific server
The product is installed as a set of pods running on a k3s deployment in a namespace called mediakind.
In the following paragraphs, more information is provided about how to interact with the different microservices composing the product as well as where to find useful information about the installation.
Interaction is possible using either the kubectl command line tool or the k9s environment tool.
-
For more details about the usage of the kubectl tool, please refer to the official documentation available here: https://kubernetes.io/docs/reference/kubectl/
-
For more details about the usage of the k9s tool, please refer to the official documentation available here: https://k9scli.io
Monitor the status of microservices
Section titled “Monitor the status of microservices”The product is composed of a set of microservices. Faults in any of them may result in misbehavior and affect customer operations.
- Login on the server where the product is installed.
- Switch to user mediakind (for password information, ask MediaKind support): su - mediakind
- Type
kubectl get pods -n mediakind | grep stream-processor. A list of pods appears with some information associated to each of them: name, ready, status, restarts, age.

The installation of the stream-processor-asi and the stream-processor-simulcrypt controls is optional. They should not be present on your system unless you have chosen to install them and executed the additional installation steps as described in the installation guides.
- Verify that the status is “Running” for all the pods. If this is not the case, the system may not behave as expected.
If any of the pods is not in “Running” state, type any or all of these commands to help you understand what is wrong:
- kubectl get pods -n mediakind: Get the status of all the pods running on the server. It may be that some other microservice is also not in “Running” state.
- kubectl describe pod -n mediakind
<pod\_name\>: <pod_name>is the name of the pod that is not in “Running” state. Check the last part of the information. It can contain a list of warning or error events.
-
Type
k9s. An interactive user interface appears. It can contain different information depending on whether it is the first time that the k9s runs on the server or not. -
Type
:namespaces. -
Press Enter.
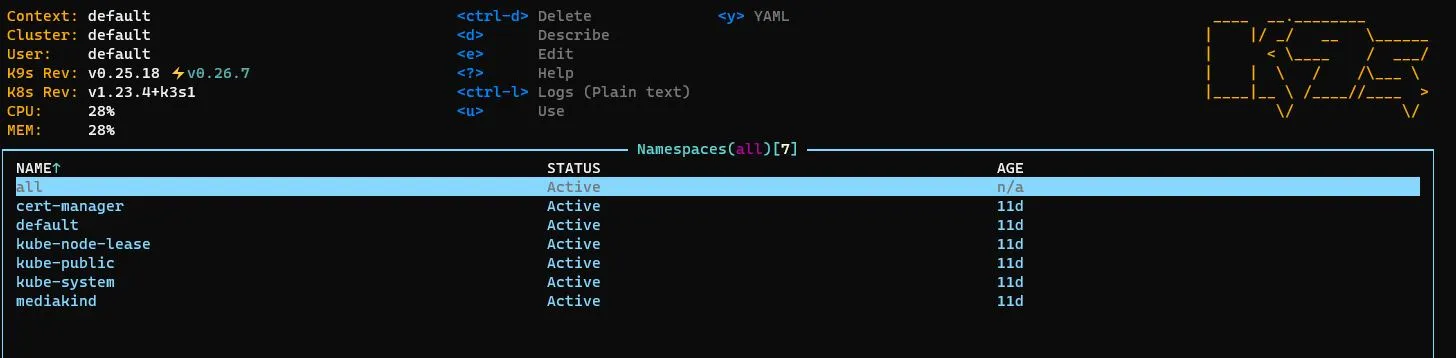
-
Use the down arrow key to highlight the line containing the string mediakind.
-
Press Enter. The user interface shows the complete list of pods running in the mediakind namespace. To check the status of the stream-processor pods, use the down arrow to scroll down until the group of pods starting with stream-processor appears.
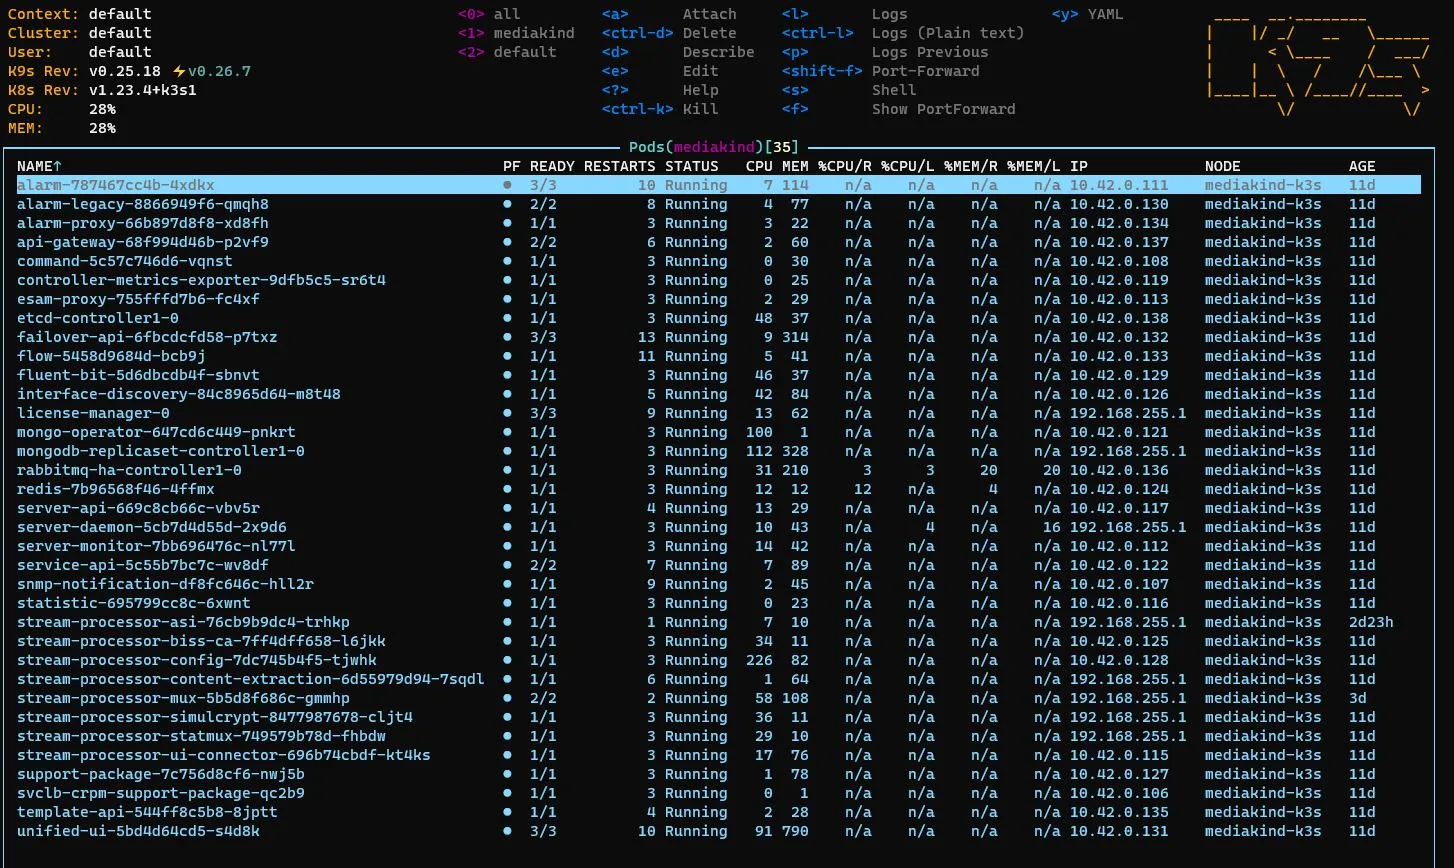
The microservices listed on your installation may be a subset of the ones in this image. The installation of the stream-processor-asi and the stream-processor-simulcrypt controls is optional. They should not be present on your system unless you have chosen to install them and executed the additional installation steps as described in the installation guides.
-
Verify that the status is “Running” for all the pods. If this is not the case, the system may not behave as expected.
If any of the pods is not in “Running” state, try the following to help you understand what is wrong:
- Use the up arrow and down arrow keys to scroll the list of all the pods and check if any other microservice is also not in “Running” state.
- When the line containing the name of the pod is highlighted, press the d key. A description of the pod appears.
- Use the down arrow key to scroll down and check the last part of the information. It can contain a list of warning or error events.
- To exit from the pod description, press the Esc key.
Get the logs from a specific service
Section titled “Get the logs from a specific service”- Login on the server where the product is installed.
- Switch to user mediakind (for password information, ask MediaKind support):
su - mediakind
-
Type
kubectl get pods -n mediakind | grep stream-processor. A list of pods appears with some information associated to each of them: name, ready, status, restarts, age.The installation of the stream-processor-asi and the stream-processor-simulcrypt controls is optional. They should not be present on your system unless you have chosen to install them and executed the additional installation steps as described in the installation guides.
-
Type
kubectl logs -n mediakind <pod name>where<pod_name>is the name of the pod associated to the microservice of interest as it appears in the output of the previous command.- For most microservices, the output contains the logs for the (single) container running in the pod. For the mux pod, add -c mux to get the logs from Mux or to get the logs from PSI.
- The output of the kubectl logs command can be easily used as input into less, grep, sed or other string/stream manipulation commands.
- It is possible to also use the bark utility installed by default with the host application:
kubectl logs -n mediakind <pod name>| barkto increase readability of the kubectl logs output.
- Type
k9s. An interactive user interface appears. It can contain different information depending on whether it is the first time that the k9s runs on the server or not. - Type
:pods. - Press Enter.
- Use the up arrow and down arrow keys to scroll through the list and highlight the microservice of interest.
- Press Enter. The list of containers running in the pod appears. Usually, there is only one container per pod, but some microservices have more. For example, the stream-processor-mux pod runs two containers. In this case, the user interface looks as follows:

- If more than container is available, use the up arrow and down arrow keys to highlight the container of interest. Otherwise, the one container of the pod will already be highlighted.
- Press the l key. The logs for the microservice appears.
The CTRL+L option may also be available. It can provide logs in a more readable format.
- To exit the logs screen, press the Esc key. To return to the pods list, press the Esc key again.
Restart a microservice
Section titled “Restart a microservice”The product microservices run as pods on the k3s deployment. The k3s framework ensures that all the required pods are always running. To restart a microservice, you only need to delete the corresponding pod. The k3s framework will restart it.
- Login on the server where the product is installed.
- Switch to user mediakind (for password information, ask MediaKind support): su - mediakind
-
Type
kubectl get pods -n mediakind | grep stream-processor. A list of pods appears with some information associated to each of them: name, ready, status, restarts, age.The installation of the stream-processor-asi and the stream-processor-simulcrypt controls is optional. They should not be present on your system unless you have chosen to install them and executed the additional installation steps as described in the installation guides.
-
Verify that the status is “Running” for all the pods. If this is not the case, the system may not behave as expected.
-
Type
kubectl delete pod <pod name\> -n mediakindwhere<pod_name>is the name of the pod associated to the microservice of interest as it appears in the output of the previous command.For example, to delete the mux pod in the previous deployment, you need to type
kubectl delete pod stream-processor-config-8774bf6c-8gwkr -n mediakind.The string pod
<pod name>deleted appears, which means that the pod has been successfully deleted. -
Type
kubectl get pods -n mediakind | grep stream-processoragain to check that a new pod for the microservice is running.
The full name of the new pod is different than the previous one.
After the Mux pod has been deleted from the previous deployment, the new name can be “stream-processor-mux-c6f5f5579-f82mz”.
-
Type
k9s. An interactive user interface appears. It can contain different information depending on whether it is the first time that the k9s runs on the server or not. -
Type
:pods. -
Press Enter. A list of all the pods appears.
-
Use the down arrow key to highlight the name of the pod of the microservice of interest.
-
Press CTRL+D. A popup window appears and asks to confirm.
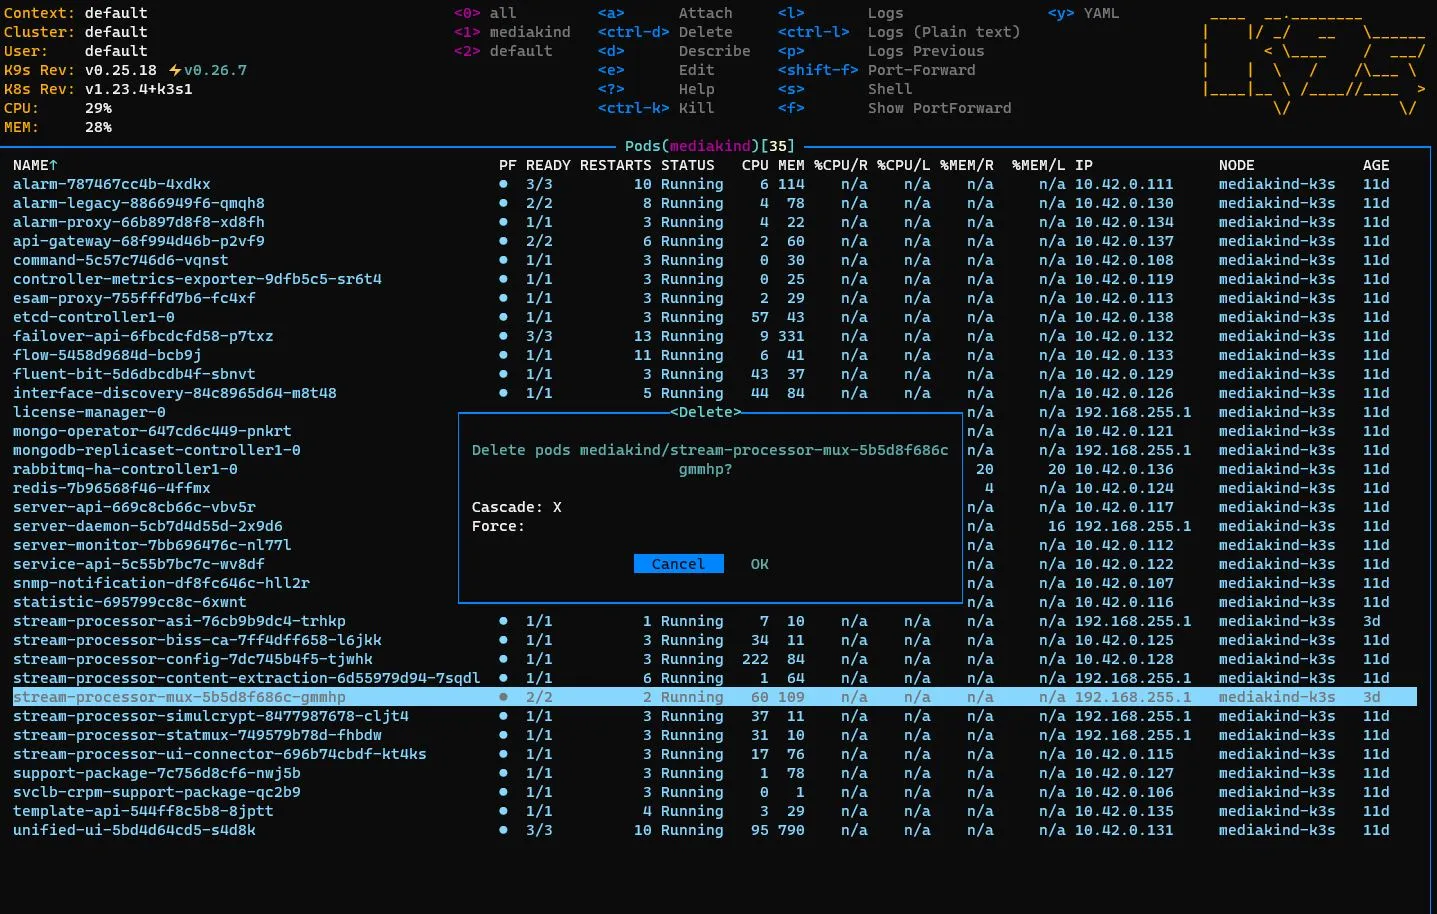
-
If you want to cancel the operation, press Enter. If you want to confirm, use the right arrow key to highlight the OK option and press Enter.
A new pod appears for the microservice. The status of the current pod shows briefly as “Terminating”, then the corresponding line disappears.
-
Verify that the status of all the microservice is “Running”. It means that the system is healthy.
Check and edit the configuration of microservices
Section titled “Check and edit the configuration of microservices”The behavior of each stream-processor microservice depends not only on the configuration chosen for the Multiplexing service (on the user interface or through the API) but also on a set of microservice-specific configuration parameters.
In other types of deployment, these could be available through config and/or ini files.
In this deployment, for each microservice, these parameters are stored in the corresponding configmap. To view and change them, you can use either the kubectl command line tool or the k9s environment tool.
Such configuration parameters include, for example:
-
the announcer addresses used for redundancy by the biss-ca, simulcrypt, statmux and Mux microservices;
-
the advanced Mux configuration parameters not exposed in the user interface but available in the “mpeg4.cfg” configuration section.
Any configmap change on your server is only applicable for the server where it is applied. If you need the same change on other servers, connect to the specific server and perform the same changes. The changes will persist across the restarts of the same microservice, but will NOT persist if a new version of the product is installed on your server.
To view a specific microservice configuration:
Section titled “To view a specific microservice configuration:”-
Type
kubectl get configmap -n mediakind | grep stream-processor. A list of configmaps appears with some information associated to each of them: name, ready, status, restarts, age.The installation of the stream-processor-asi and the stream-processor-simulcrypt controls is optional. They should not be present on your system unless you have chosen to install them and executed the additional installation steps as described in the installation guides.
-
Type
kubectl get configmap -n mediakind <configmap> -o yamlwhere<configmap>is the name of the configmap associated to the microservice of interest as it appears in the output of the previous command.
The output contains all the configuration parameters for the specified microservice.
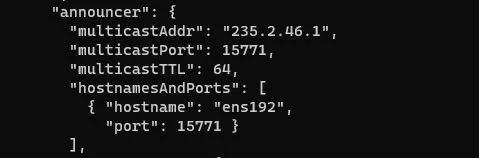
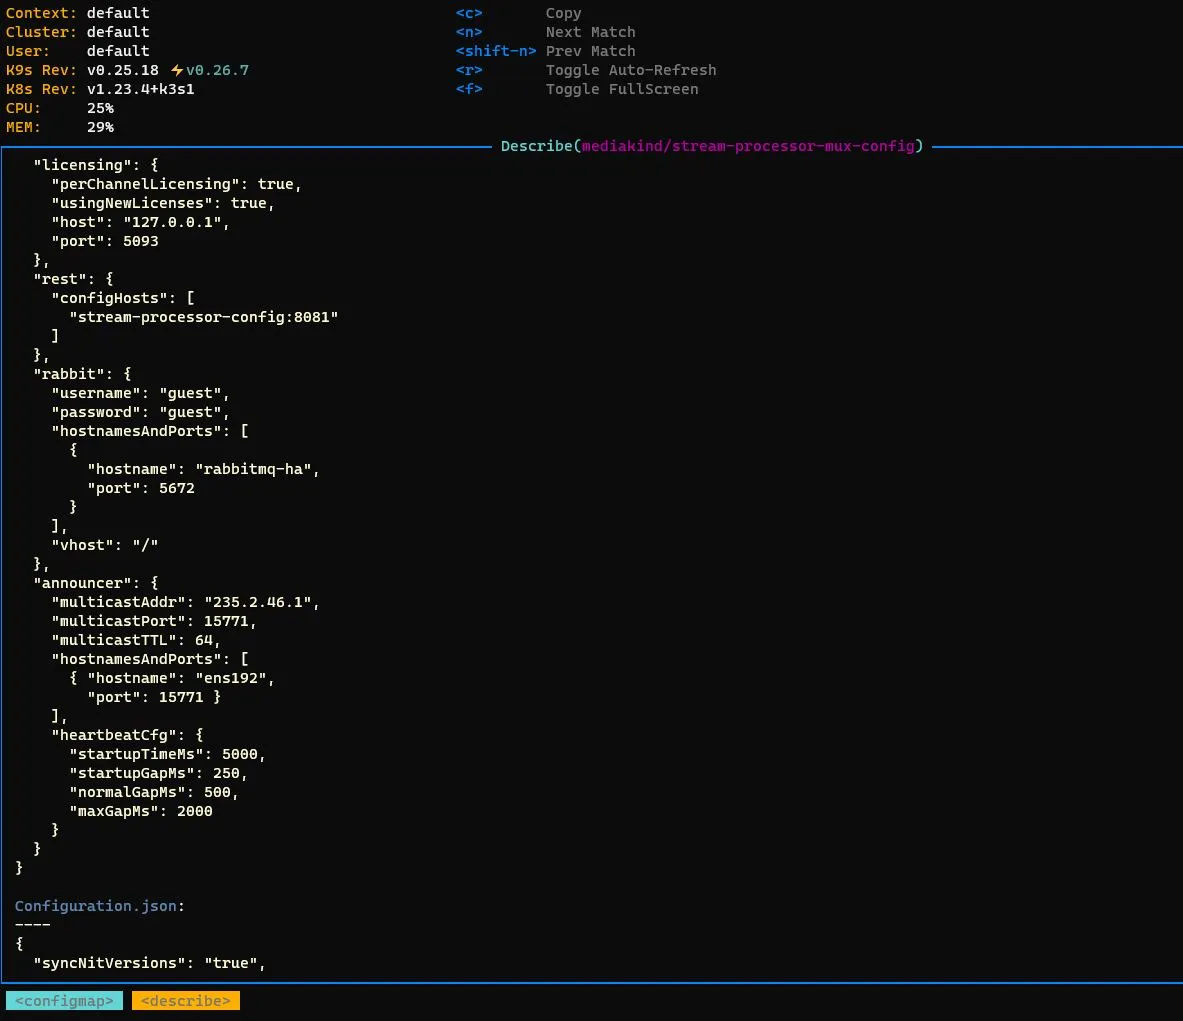
To check the announcer muticast information for the Mux microservice, type kubectl get configmap -n mediakind stream-processor-mux-config -o yaml and search for the announcer part of the sparkmuxIni.json: section. It should look like this, but with a different value for the multicastAddr field, depending on your deployment and installation options:
To edit a specific microservice configuration:
Section titled “To edit a specific microservice configuration:”-
Type
kubectl get configmap -n mediakind | grep stream-processor. -
Type
kubectl edit configmap -n mediakind <configmap>where<configmap>is the name of the configmap associated to the microservice of interest as it appears in the output of the previous command. The configmap is now open in vi editor and can be edited. -
Apply your changes and save the configmap.
-
Restart the microservice.
Although the changes have been saved in the configmap and can be viewed, they will not be applied by the microservice code until it is restarted.
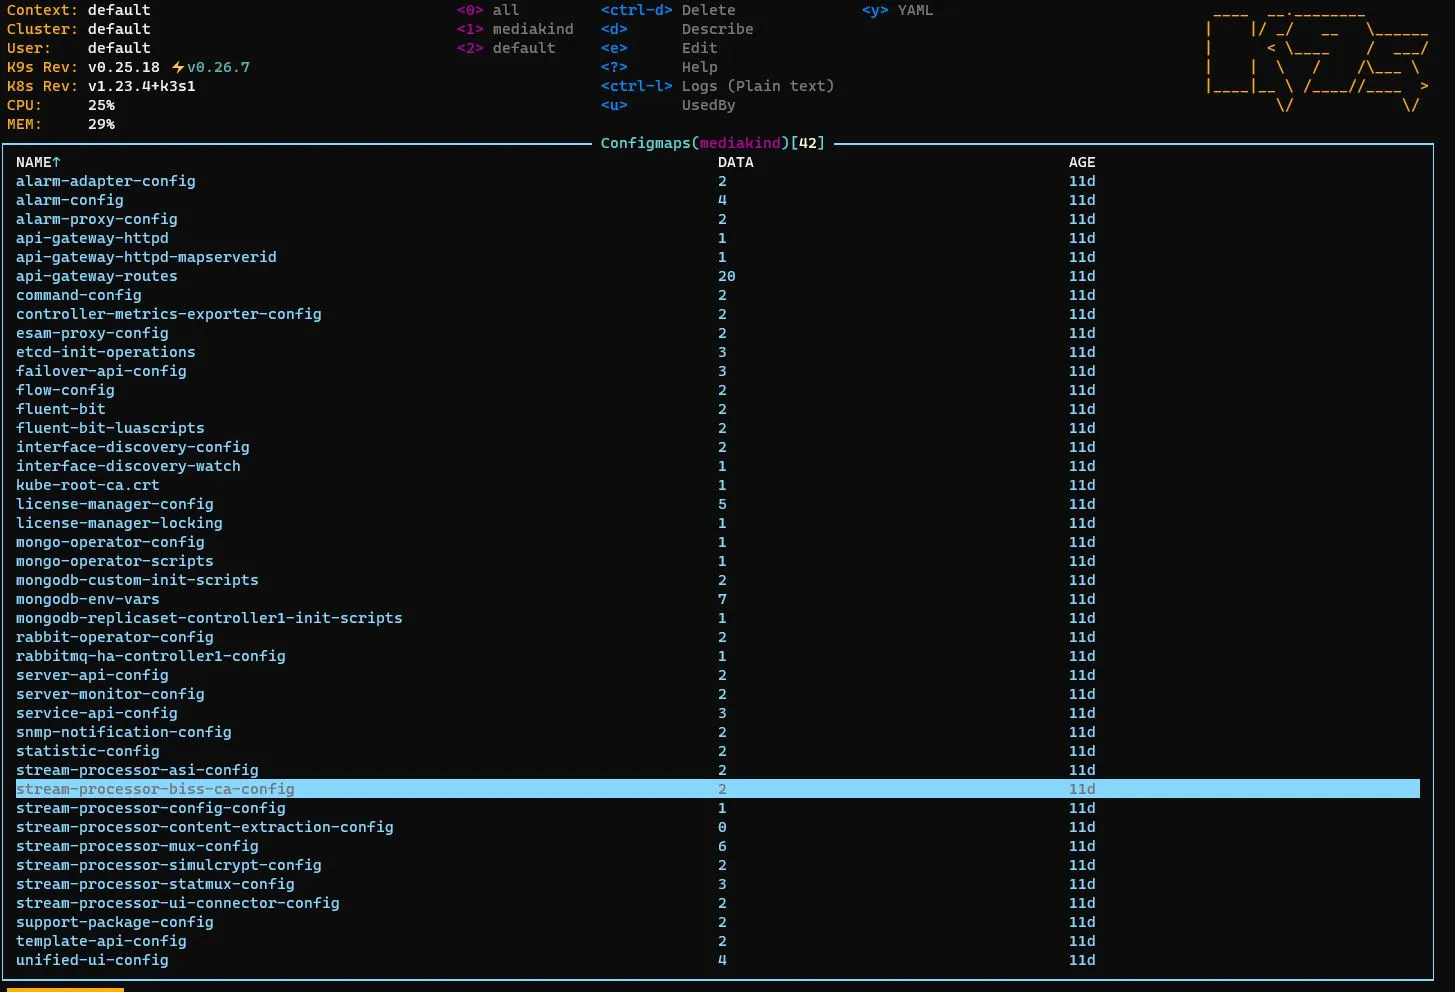
To view a specific microservice configuration:
Section titled “To view a specific microservice configuration:”-
Type
k9s. An interactive user interface appears. It can contain different information depending on whether it is the first time that the k9s runs on the server or not. -
Type
:configmaps. -
Press Enter. A list of all the configmaps appears.
-
Use the down arrow key to highlight the name of the configmap of the microservice of interest.
-
Press Enter to view its content.
To check the announcer multicast information for the Mux microservice, use the up arrow and down arrow keys to highlight the stream-processor-mux-config:
Then press Enter and use the down arrow key. It should look like this, but with a different value for the “multicastAddr” field, depending on your deployment and installation options:
To exit the configmap content view and return to the list of configmaps, press the Esc key.
To edit a specific microservice configuration:
Section titled “To edit a specific microservice configuration:”-
Type
k9s. An interactive user interface appears. It can contain different information depending on whether it is the first time that the k9s runs on the server or not. -
Type
:configmaps. -
Press Enter.
-
Use the down arrow key to highlight the name of the configmap of the microservice of interest.
-
Press the e key. The configmap is now open in vi editor, and can be edited.
-
Apply your changes and save the configmap.
-
Restart the microservice.
Although the changes have been saved in the configmap and can be viewed, they will not be applied by the microservice code until it is restarted.
Further interaction with your k3s deployment
Section titled “Further interaction with your k3s deployment”You can use kubectl or k9s to get additional information about your deployment status and configuration.
Here are a few examples of useful operations, assuming that the user is now familiar with either tool.
-
Check the version of a specific microservice: if the user interface is not available, it is possible to see the version of the microservices and all the containers by accessing their deployment.
k9s: deployments:, **d**(describe)kubectl: kubectl get deployments -n mediakind, kubectl get deployment <microservice> -n mediakind -o yaml
-
Save the deployment or configmap for a microservice as yaml to file for later comparison with configuration on other servers
Check latest installation options
Section titled “Check latest installation options”To check the options used for the last product installation:
-
Check the version of the product currently running on your server (either using the user interface or the kube commands).
-
Navigate to the
/var/installfolder and list its content:cd /var/installlsYou see at least one subfolder named
stream-processor-xxxwhere xxx is the version of the installed product. If you have installed different versions, you may see a few similar folders. -
Navigate to the
stream-processor-xxxfolder corresponding to the version currently running. It contains a subfolder called either standalone, controller, compact or server, depending on the type of installation (see the installation guides for details). -
Navigate to the subfolder.
-
Read the previous installation parameters from the
last_configure.shfile:cat last_configure.sh