Configure the Live Encoder
Configuring a Live encoding service is a 3-step procedure:
- Step #1: Create a Live encoding service.
- Step #2: Configure the Live Encoding service.
- Step #3: Assign a server to run the service.
Step #1: Create a Live encoding service
Before you start, ensure you have imported or created a lineup configuration file.
Select Services > Add service > Live encoding. The service General tab is displayed.
Step #2: Configure the Live Encoding service
To configure Live Encoder, follow these steps:
- Configure service general parameters.
- Configure input parameters.
- Configure encoding parameters.
- Configure output parameters.
Configure service general parameters
-
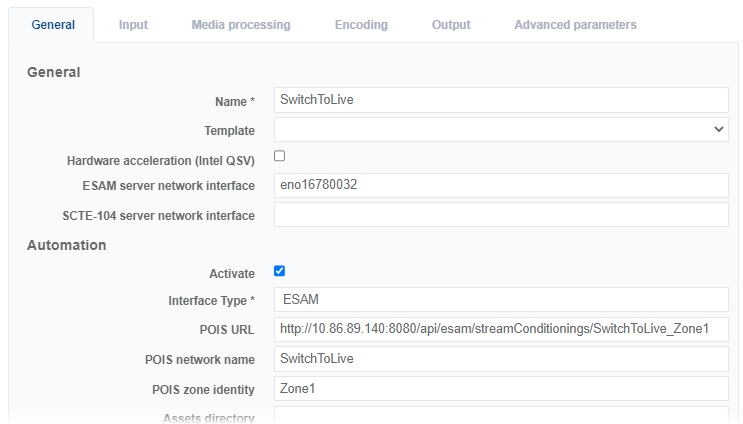
From the General tab, enter a service name.
-
Enter the name of the ESAM network interface (in our example, we are using the management interface, eno16780032).
-
Tick the Activate checkbox to enable the Automation features then configure the parameters:
Parameter Value Description Interface Type ESAM Protocol used with automation system. POIS URL http://10.86.89.140:8080/api/esam/streamConditionings/SwitchToLive_Zone1URL on which Live Encoder will return status to Prisma.
http://<controllerVIP>:[prisma.controller.port]/api/esam/streamConditionings/[endPointID]
Note:[endPointID]corresponds to the ID of the Stream Conditioning service that you previously created on Prisma.POIS network name SwitchToLive ID shared with the POIS for the current channel.
Same as the Network name in Stream Conditioning > Connections.POIS zone identity Zone1 The area ID for this channel distribution. Commonly used for regionalization.
Same as the Zone identity in Stream Conditioning > Connections.Assets directory (Leave empty) You can specify the directory where assets are stored. Must be an absolute directory path (starting by "/"). For logo and blackout files, an HTTP URL is also possible. You should have the following configuration:
-
Continue to Configure input parameters.
Configure input parameters
-
Open the Input tab to configure input according to your network configuration.
-
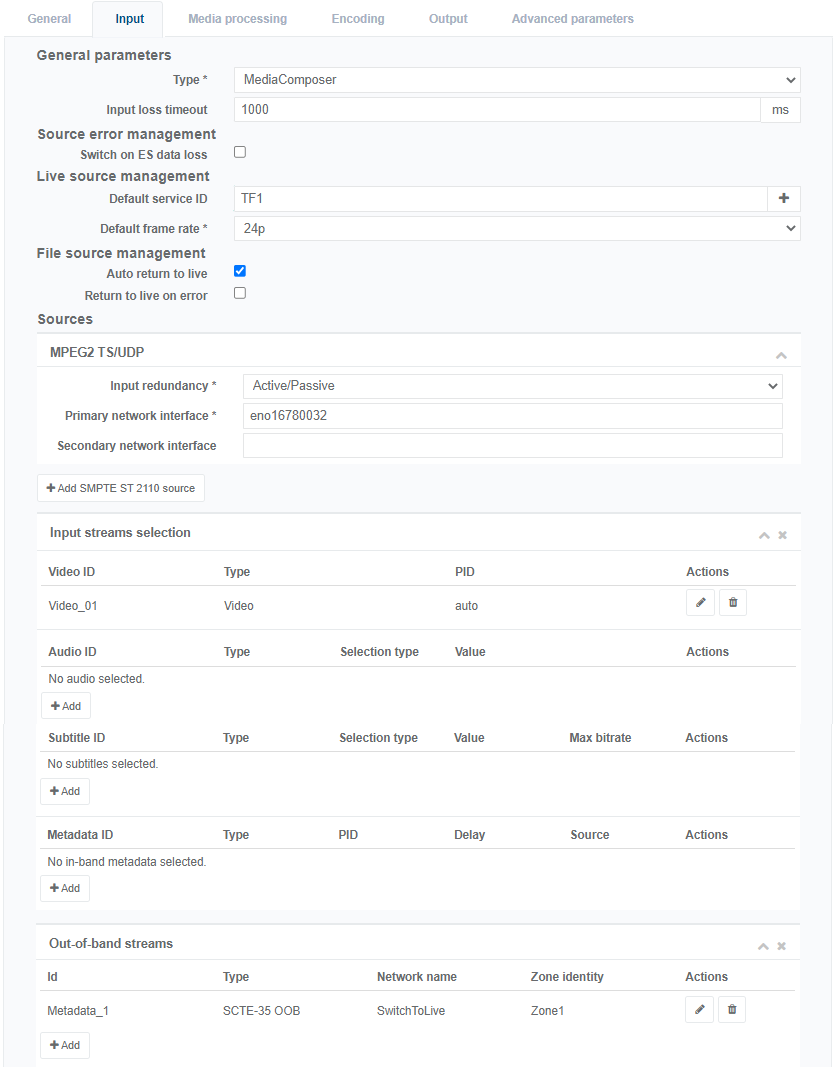
Configure General parameters: Select MediaComposer for Type.
-
Configure the Live source management parameters:
Parameter Value Description Default service ID TF1 ID of the live content that will be used at the start of the service. You can either:
- select an existing ID. If required, this ID can be directly modified via the button.
- or create a new ID: either immediately by clicking the + button, or later from the Settings > Live service lineup left-side menu panel.
Note: IDs are defined in the lineup configuration file.Default frame rate 24p Default frame rate used when live input is not yet detected. -
Configure File source management:
Parameter Value Description Auto Return to Live Tick this checkbox If checked, returns to live at end of the offline source playlist.
Note: Unused in Switch to Live use case.Return to Live on error Tick this checkbox. If checked, returns to live if offline source playlist cannot be loaded.
Note: Unused in Switch to Live use case. -
Configure Sources:
-
Configure the MPEG-2 TS/UDP parameters:
Parameter Value Description Input redundancy Active/Passive Choose the redundancy settings. Two modes can be set when two multicast sources (primary and secondary) are available:
- In Active/Passive mode, the passive source is idle and doesn't even join the multicast address or capture UDP packets.
- In Active/Active mode, both sources capture in parallel, provide statistics on transport and demux layers, but only one source is fully decoded at any given time.Primary interface eno16780032 Name of the input interface used to capture the input stream.
Note: In our example, we are using the management interface.Secondary interface Leave empty. Name of the input interface used to capture the input stream (secondary source).
Note: Only necessary in case of Active/Active redundancy. -
Configure Audio and Video inputs.
-
Configure the Out of band streams to receive information from Prisma:
Parameter Value Description Type SCTE-35 OOB Select the type of metadata. Network name SwitchToLive Corresponds to the Acquisition Point Identity defined in the ESAM specification. Zone identity Zone1 Corresponds to the Zone Identity defined in the ESAM specification. Recover conditioning state if failover Leave to No Selecting POIS enables to keep the conditioning status after an encoder failover by asking to an external system. It requires entering the POIS URL and network interface name. Automation stream Tick this checkbox. Activates Live Encoder out-of band interface to communicate with Prisma.
-
-
Click OK to validate. You should have the following configuration for the Input tab:
-
Click Save and continue to save your changes.
-
Leave the Media processing parameters unchanged.
Configure encoding parameters
-
From the Encoding tab, create the following streams:
- ABR video stream
- Audio stream
- Metadata stream
-
Click Save and continue to save your changes.
Configure output parameters
-
Open the Output tab then click Add an output.
-
Configure the General parameters according to your network configuration, especially check that GOP signaling is set to EBP based to be compliant with Live Packaging.
-
Leave the Common MPEG-2 TS parameters unchanged.
-
Configure the Output stream for this service:
-
Scroll to Output streams, then click Add.
-
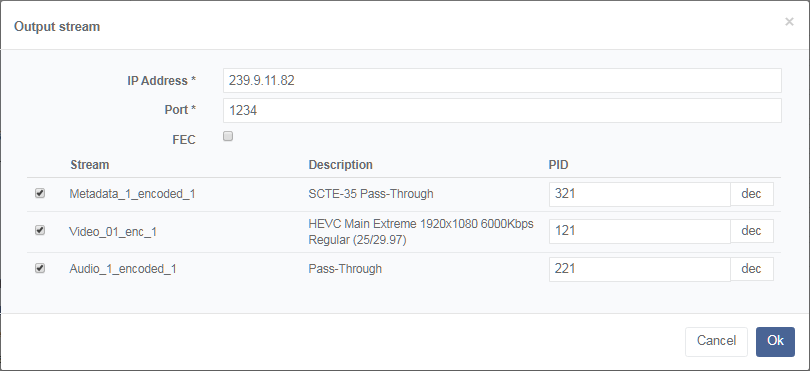
Configure the output stream parameters:
- IP Address: address to output the stream
- Port: port number to stream on
-
Select the encodings to include in the output stream:
- Video encoding for this output stream
- At least one audio encoding
- Metadata encoding
You should have the following configuration:
-
Click OK.
-
-
Click Save and exit to save and finalize your service configuration and go back to the Services page.
Step #3: Assign a server to run the service
Services require a server to run. Select a server for each service before starting the service.
-
Display services.
-
Click the field in the Mandatory column to display available servers.
-
Enter a server name or select a server from the list.
-
Click to start the service.
-
Click to display service details and to monitor the service.
-
Continue to Create an alternate content operation.