Configure blackout
Configure an automated blackout
Live Encoder can blackout a program on SCTE-35 trigger and replace the video with a still image.
SCTE-35 metadata can be:
- either in-band
- or out-of-band
Before you start: ensure you have configured the SCTE-35 metadata in the input stream.
To create a scheduled blackout, follow these steps:
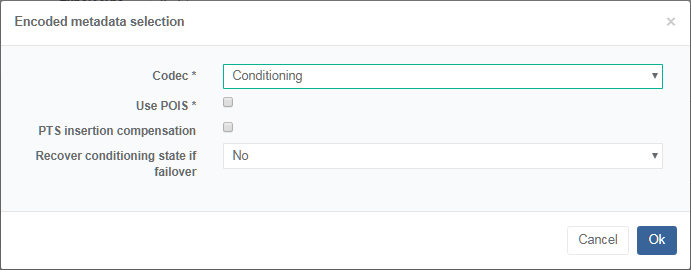
Configure the metadata encoding
-
From the Encoding tab, go to the Metadata encoding section.
-
For each SCTE-35 metadata, click in the Actions column then set the Codec to Conditioning.
-
Click Ok to validate.
Configure the blackout encoding
-
Go to the Blackout configuration section.
-
Click Add then configure a blackout configuration by selecting and setting the adequate blackout parameters.
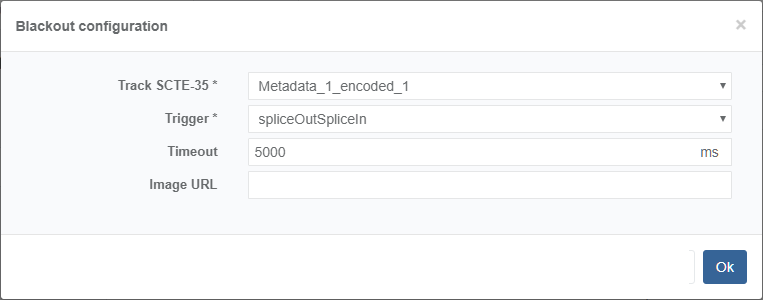
-
Click Ok to validate.
Configure the video encoding
-
Go to the Video encoding section.
-
For each video stream, select the associated Stream Conditioning and Blackout configuration.

-
Click Ok to validate.
Configure the audio encoding
-
Go to the Audio encoding section.
-
For each audio stream, select the associated Blackout configuration.
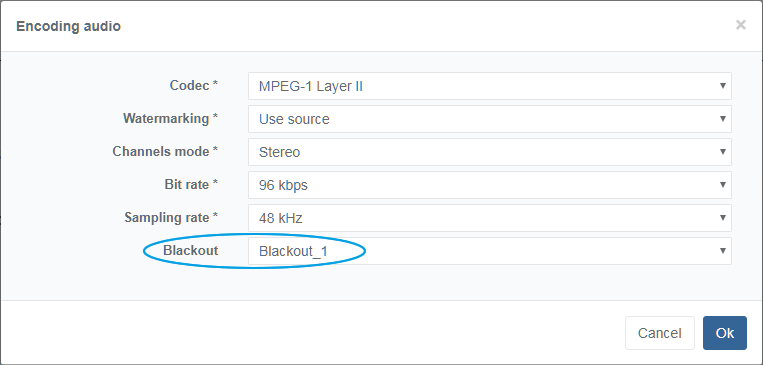
-
Click Ok to validate.
Configure the subtitle encoding
-
Go to the Subtitle encoding section.
-
For each subtitle stream, select the associated Blackout configuration.

-
Click Ok to validate.
Check that blackout is present in the output
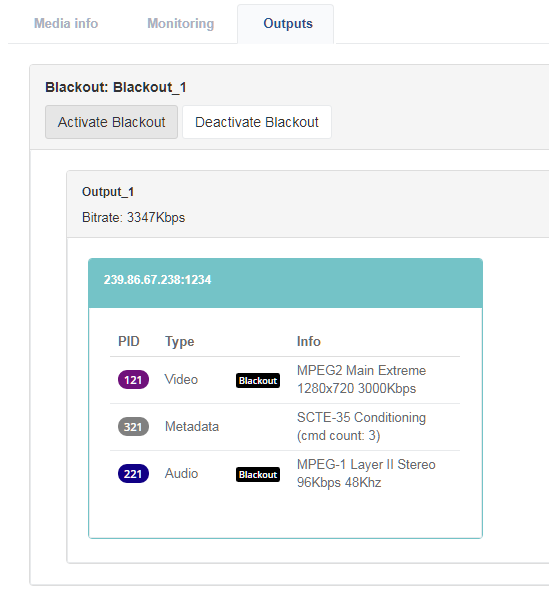
Open the Output tab to ensure that blackout is present in the output.
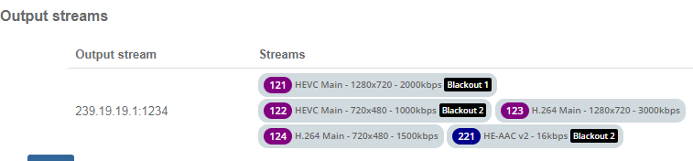
 Example of output with blackout configured
Activate blackout.
Configure a manual blackout
To configure a manual blackout, follow these steps:
Activate ESAM
From the General tab, set the ESAM server network interface to activate ESAM.
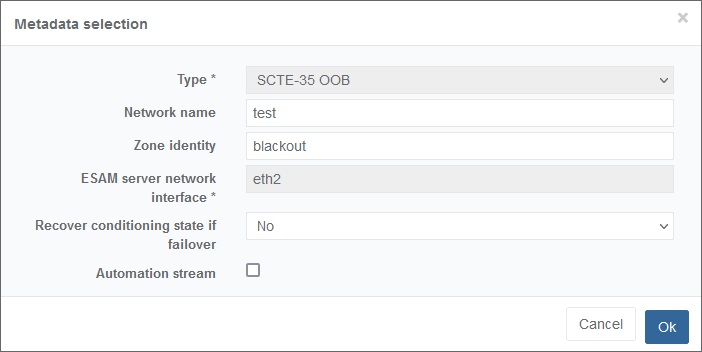
Create an SCTE-35 out-of-band input stream
Go to the Input > Sources > Out-of-band streams section to create an SCTE-35 out-of-band input stream.
Configure the metadata encoding
-
From the Encoding tab, go to the Metadata encoding section.
-
Next to your SCTE-35 metadata, click the edit button, in the Actions column then set the Codec to Conditioning.
-
Click OK to validate.
Configure the blackout encoding
-
Go to the Blackout configuration section.
-
Click Add then configure a blackout configuration by selecting and setting the adequate blackout parameters.
-
Click OK to validate.
Configure the video encoding
-
Go to the Video encoding section.
-
For each video stream, click to select the associated Stream Conditioning and Blackout settings.
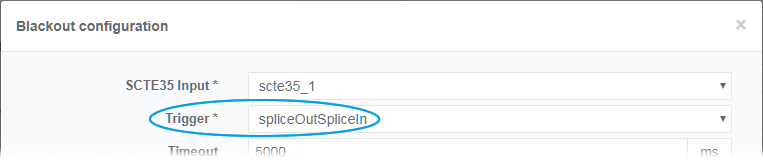
Example of configuration for Stream Conditioning and Blackout parameters -
Click OK to validate.
Check that blackout is present in the output
Open the Output tab to ensure that blackout is present in the output.
Example of output with blackout configured
Save
Return to the list of services, or edit any parameters then save.
Check statistics
-
From the list of services, click to view statistics.
-
Ensure that blackout configurations display as expected in the Monitoring section of the Statistics page.
Activate blackout
Configure a scheduled blackout
Creating a scheduled blackout is a 4-step process:
- Create a scheduled blackout configuration.
- Apply a blackout configuration to video encodings.
- Apply a blackout configuration to audio encodings.
- Check blackout configurations.
Create a scheduled blackout configuration
Live Encoder can blackout a program and replace the video with a still image.
You must first create the blackout configuration, then configure to apply to video encodings.
Before you start, ensure that:
- A Metadata input stream must exist.
- Metadata processing is set to Conditioning in Metadata encoding parameters.
Audio plays during blackout, unless you configure the blackout to mute audio.
-
Display services.
-
Click to edit the service.
-
Click the Encoding tab to display encoding options.
-
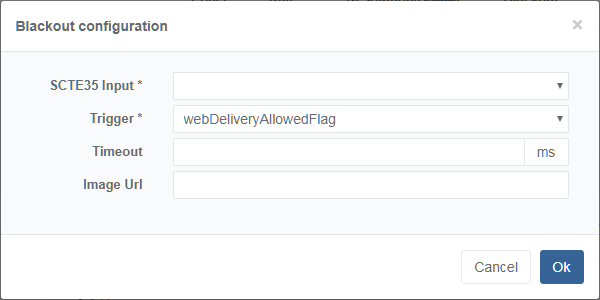
Scroll to Blackout configuration and click +Add to display parameters. The Blackout configuration options display.
You can create multiple blackout configurations for a single service.
-
Configure the parameters, then click Ok to save. Blackout configurations display in the list (see image below).
If no SCTE-35 Input options display in the list, then reconfigure inputs.

-
Use the save options to save configurations.
-
Apply the blackout configuration to a video and/or audio encoding.
Apply a blackout configuration to video encodings
You can apply a blackout configuration per video encoding.
Before you start: ensure that you created at least one blackout configuration.
Blackout is not supported in Pass-through.
-
Display services.
-
Click to edit the service.
-
Open the Encoding tab, then click to edit the video stream.
-
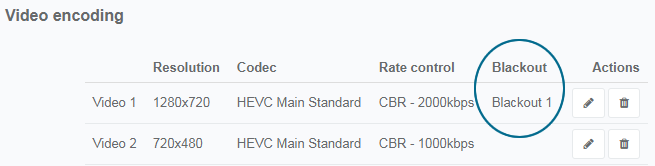
Select the blackout option. All previously created blackout configurations display.
-
Check that the applied Blackout option displays for video encodings.
-
Use the save options to save configurations.
-
Ensure that Blackout configurations are configured and applied as expected.
Apply a blackout configuration to audio encodings
You can apply a blackout configuration per audio encoding.
before you start, ensure that you have created at least one blackout configuration.
Blackout is not supported in Pass-through.
-
Display services.
-
Click to edit the service.
-
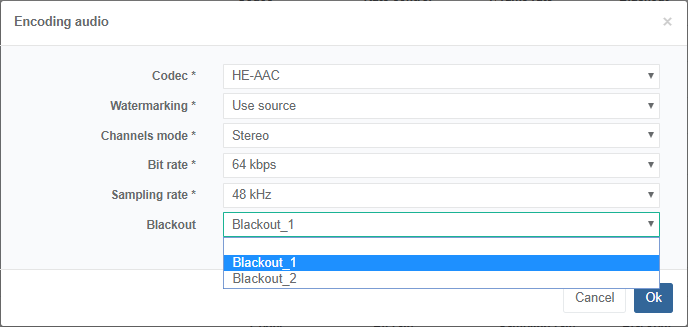
Open the Encoding tab, then click to edit the audio stream, or Add a stream.
-
Click Blackout to display the list of previously created blackout configurations, then select a blackout configuration to apply.
-
Click OK to save.
-
Check that audio encodings display in the list with the blackout tag displayed.

Check blackout configurations
Blackout configurations are first created, then applied to video and/or audio encodings. The encodings are then configured in an output stream. Check the overviews to ensure that blackouts are configured and applied.
-
Display services.
-
Click to edit the service.
-
Open the Encoding tab and ensure that any expected blackout configurations display in the list.
-
Check video and audio encodings to ensure that blackout configurations are applied as expected.
-
Open the Output tab to ensure expected video and audio encodings display in the list.
-
Return to the list of services, or edit any parameters and then save.
-
From the list of services, click to view statistics.
-
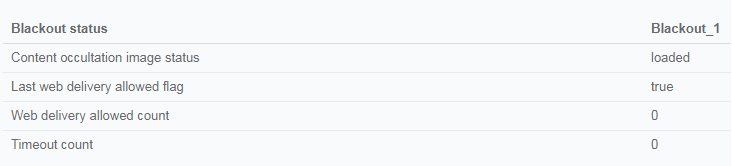
Ensure that blackout configurations display as expected in the Statistics page.
Activate blackout
Manually activate or deactivate a blackout
Once you have configured a manual or an automated blackout and started a service, you can manually activate or deactivate it.
Manual blackout activation/deactivation is only available if Trigger parameter is set to spliceOutSpliceIn.
- Display statistics on Outputs.
-
Click the Activate Blackout button. A message informs you that the command has been sent.
-
Click OK. The current video is blacked out until the specified Timeout (if configured); or by clicking the Deactivate Blackout button.