Configure the video encoding parameters
To configure the video encoding parameters, follow these steps:
-
From the Encoding tab, go to the Video encoding section.
-
Click the Add button to create a video profile or click in the Actions column to configure an existing profile.
-
Enter the appropriate value for Video encoding parameters.
-
If you selected Statmux rate control, expand the Statmux advanced settings section then enter the appropriate value for each parameter.
-
Expand the Codec settings section then enter the appropriate value for each parameter.
-
Expand the Video processing section then enter the appropriate value for each parameter.
-
Expand the GOP settings section then enter the appropriate value for each parameter.
-
Expand the Aspect ratio section then enter the appropriate value for each parameter.
-
Expand the Stream metadata settings section then enter the appropriate value for each parameter.
-
Expand the Subtitle settings section then enter the appropriate value for each parameter.
-
Cick Ok to validate.
-
You can create a child encoding.
-
You can configure HDR signaling conversion (HEVC).
-
Click Save and continue or Save and exit to save your changes.
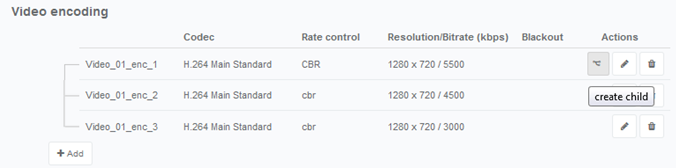
Create a child encoding (factorization)
MediaKind Live Encoder can factorize the encoding of ABR profiles that have the same resolution and frame rate: processing for parent and child encodings is mutualized to optimize CPU usage.
Before you start: ensure you have created a video encoding stream. This main video stream will be considered as parent.
To create a child video encoding, follow these steps:
-
Select the parent video stream you want to factorize.
-
Click in the Actions column to create and configure a child encoding with the corresponding target bit rate.
Child stream bitrates must be more than half of the parent bitrate.
-
Click Save and continue or Save and exit to save your changes.
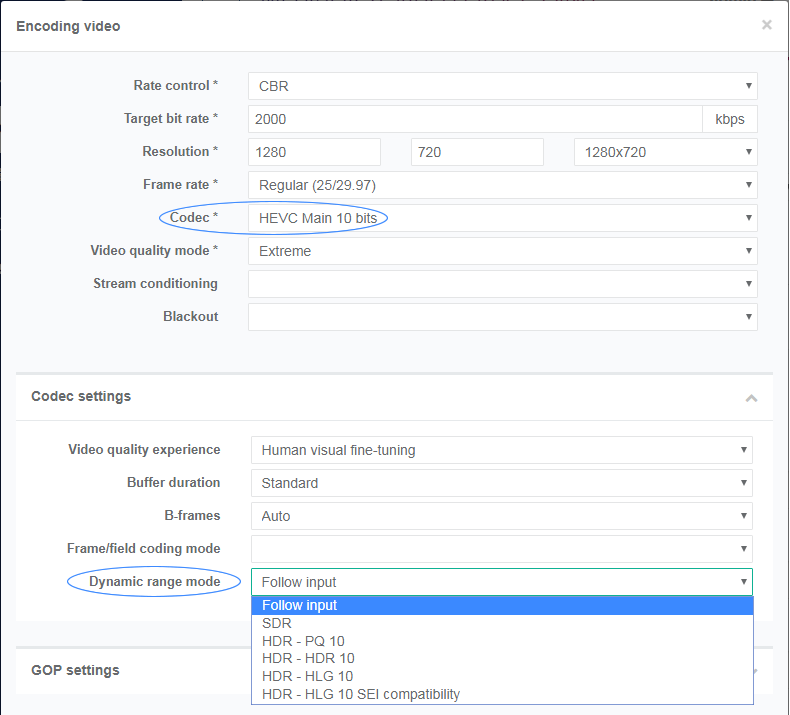
Configure HDR signaling conversion (HEVC)
You can configure HDR signaling conversion in the encoding options, or choose to keep the initial input ‘as is’ using the Follow input option.
-
From the Video encoding section, click Add to create and configure a new video stream or click to edit an existing video stream.
-
Set the video codec to HEVC main 10 bits.
-
Expand the Codec settings section.
-
Configure the Dynamic range mode depending on your conversion requirements.
-
Click Ok to validate. The Encoding page is displayed.
-
Click Save and continue or Save and exit to save your changes.
Align EBP acquisition time on timecodes
This feature is only available with advanced parameters.
This feature allows aligning wallclock time in the output segments.
A typical use case is when you have several live channels with feeds coming from distinct cameras. The use of the Timecode for the EBP acquisition time allows the end-user player to switch to the closest segment when switching from one live channel to another.
To configure a service, follow these steps:
-
Create an Internet TV service named wallClock.
-
Go to the Advanced parameters tab, then click Add an enter the following parameters:
Parameter name Description Value videoSynchronizer.alignEbpAcquisitionTimeOnTimecodesActivates this feature. Set to true videoSynchronizer.alignEbpAcquisitionTimeOnTimecodes.marginMargin in seconds Default value is 10 -
Go to the Output tab, click Add an output then go to the General parameters section and set the GOP signaling to EBP-based.
-
Click Save and exit to save and finalize your service configuration and go back to the Services page.
-
From the Services page, click the icon of the wallClock service to display statistics.
-
Go to the Monitoring page: EBP alignment on timecode information is displayed at the bottom right. It includes two parameters:
- Aligned status: indicates if the UTC time was aligned with the Timecode. Possible values: true or false
- Offset (ms): offset in milliseconds between the Timecode and UTC time (average on 1 second).
These two parameters let you check if the Timecode and NTP time are almost aligned. They are almost aligned:
- if the absolute value of the difference is lower than the margin specified in the Advanced parameters,
- or if the absolute value of the difference is greater than the number of seconds in an hour (3600) minus the margin. This means that the timecode and UTC time are spread on two distinct hours.
An alarm can be raised if the UTC Timecode cannot be aligned on the EBP Timecodes, either because there are no Timecodes or because the offset is larger than the margin.