Configure the service general parameters
Configure general parameters
-
When creating a new service, you can:
- Specify its name and optionally the template that will be used to create this new service
- Activate the hardware acceleration (Intel QSV)
- Define the network interface used for ESAM out-of-band messages
- Define the SCTE-104 network interface used for SCTE-104 out-of-band messages
See General parameters for more details.
-
You can activate automation mode and configure the associated parameters (see Technical Note "Automation for scheduled blackout").
-
You can activate the synchronization between two services by ticking the corresponding checkbox (see Synchronize two services and Split one OTT service on the same server. New parameters are displayed. Enter the appropriate value for each parameter.
-
You can activate the dual output prevention
-
You can define variants: Redundancy for 1+1 redundancy (i.e. primary and secondary) and Subsets. These variants will be used in output streams to synchronize streams or to distribute the streams across multiple servers.
Configure clock synchronization
By default, the Program Clock Reference (PCR) used in the encoder is locked to the input clock available in the source. As an alternative, Live Encoder can use the external NTP clock
External SDI Genlock clock is only visible if you set the advanced parameter enableExternalGenlockClock to true.
When using the external NTP, it is not possible to enable the service synchronization feature (see Synchronize two services).
To synchronize the PCR to the external NTP clock, follow these steps:
-
From the General tab, go to the Clock synchronization section.
-
In the Program Clock Reference (PCR), select either External NTP clock or External SDI Genlock clock from the drop-down menu.
-
Select a Save option to save changes.
Synchronize two services
Before you start, ensure the two services are identical, same address and same port.
To synchronize two services and achieve the 1+1 redundancy, follow these steps:
-
From the General tab, go to the Services synchronization section then tick the Activate checkbox. Parameters related to the synchronization are displayed.
-
You can edit the synchronization parameters.
-
From the Output tab, click to edit the output parameters.
-
In the General parameters section, tick the Synchronize checkbox. The synchronization is automatically activated in the output, but you can deactivate it (see Output parameters).
-
Select a Save option to save changes.
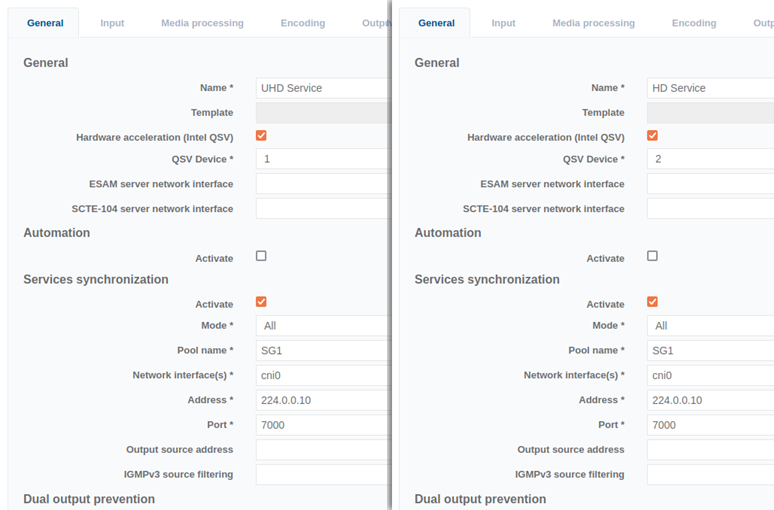
Split one OTT service on the same server
Before you start: ensure the two services are identical, same address and same port.
On SG1-based systems, there are multiple GPUs. In some instances, it can be necessary to create a large ABR ladder that cannot fit on a single GPU.
To split an OTT service on the same server, follow these steps:
-
From the General tab, define two (or more) QSV services and assign each to a different QSV Device.
-
For both services, go to the Service synchronization section then tick the Activate checkbox. Parameters related to the synchronization are displayed.
-
Edit an identical configuration for both services (see Synchronize two services).
-
Enter a memorable identifier for the Pool name (in our example, SG1).
-
Select a Network interface that can be used for the communication multicast then enter a multicast address and port.
-
-
In the Input tab, configure both services to ingest the same source.
-
In the Encoding tab, ensure that all encoders have matching GOP settings.
-
Ensure that all the output multicasts are on different address/port combinations.
-
In the Output tab, click to edit the output parameters then from the
-
In the General parameters section, tick the Synchronize checkbox. The synchronization is automatically activated in the output, but you can deactivate it (see Output parameters).
-
Select a Save option to save changes.
Configure dual-output prevention
The dual output prevention feature allows the operator to prevent from duplicate media multicast on the same network, especially in the case of active/active encoders.
This feature is based on the Multicast Guard Protocol (MGP) according to the following principles:
- Point-to-point communication between both encoders using multicast messages on a dedicated port.
- Both encoders constantly check that one and ONLY one encoder has its output enabled.
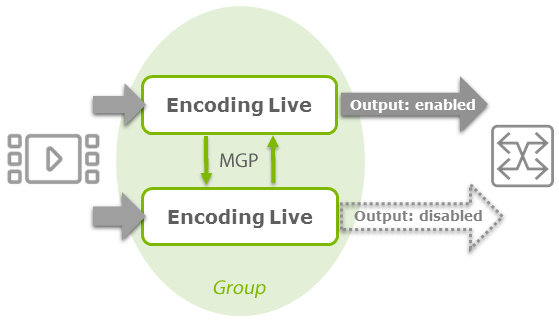
By default, the first encoder that starts has its output enabled, but you can force the output status via the API.
Benefits for the operator are:
- Remove network multicast conflicts
- Protect against management communication loss
- Near-seamless switching during manual failover
To configure dual-output prevention, follow these steps:
-
On the first encoder, click the General tab then go to the Dual output prevention section and tick the Activate checkbox. Parameters related to the dual output prevention are displayed.
-
You can edit the dual output prevention parameters:
Parameter Description Network interface Name of the network interface used to communicate between the two encoders. Address Multicast address used to communicate between the two encoders. Port Port used to communicate between the two encoders. Group name Group name that identifies the pair of encoders for which dual output prevention is managed.
These parameters must be the same for both encoders.
-
Repeat steps #1 to #3 on the second encoder.
-
Select a Save option to save changes.
-
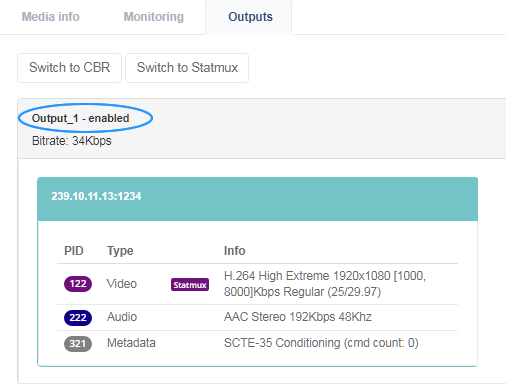
You can go to the Statistics > Outputs to view the encoder status (enabled/disabled).
See also
Dual-output prevention parameters
Create server variants
There are two types of server variants:
- variants based on redundancy: primary and secondary
- variants based on a defined subset
Once created, these variants can be used to synchronize streams or to distribute the streams across multiple servers.
Create redundancy variants
To create redundancy variants, follow these steps:
-
From the General tab, go to the Server variant configuration section.
-
Tick the Activate checkbox. Primary and secondary variants are automatically created.
-
Click to edit the Server tags.
Create subset variants
To create subset variants, follow these steps:
-
From the General tab, go to the Variants section.
-
In the Subset subsection, click Add. A new window is displayed.
-
Enter a subset Name, for example SD or HD and Server tags (see Server variant parameters).
-
Click Ok to save.
-
You can use these subsets to synchronize streams or to distribute the streams across multiple servers (see Link an output stream to a predefined subset.