Manual configuration
This section provides an overview of how to manually configure programming events using SCTE-224.
To configure an event like blackout for a given audience, you will need to configure the following SCTE-224 resources:
- Media element
- Audience
- Viewing Policy
- Policy
- Media Point
Configure a Media element
A Media element represents any form of on-demand, time-shifted and linear content. It will be mostly used to describe program event data for linear type of content (namely, a live channel).
Following SCTE-224 standard, a Media element is the top-level, global element which contains a collection of MediaPoint elements. In other words, a Media element contains all the scheduling information: at a given time and/or based on in-band SCTE-35 signaling, a certain policy shall be applied or removed for instance.
To configure a Media element, follow these steps:
-
Click the Media tab.
-
Click the Add button to add a media resource.
-
Enter and/or select the appropriate value for each parameter:
Parameter Description Media ID For sake of clarity we recommend the following syntax: /{content_Provider_name}/media/{channel_distribution_name}
Example:/CBS/media/KCBS-TVAlternative ID (optional) Alternative identifier that may be used to support correlation with other identification schemes.
Example: use of DOI for Digital Object Identifier.Description Short description of the Media.
As this field is used at different levels of the UI (in particular the scheduling view with media points), we recommend configuring an explicit channel name.Metadata Additional metadata may be added, in text or XML format. Source Default source identifier.
Providing a default source is helpful when a Media element is used to reference multiple content sources (like it is the case when managing alternate broadcast content switching).Effective/Expires Date and time when a contained media point first becomes eligible or is no longer eligible respectively.
Most of the time, these two fields are left blank. They only need to be configured for specific purposes.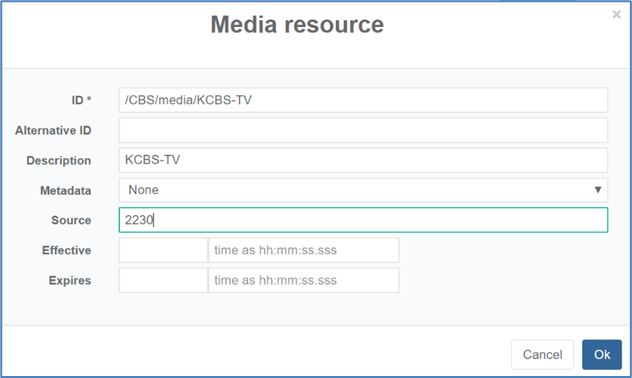 Media configuration
 -
Click Ok to validate. the Media is added to the list of media resources:
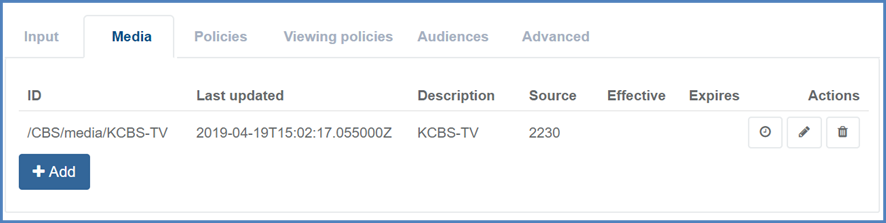 Media list
Configure an Audience
In SCTE-224 language, an Audience element represents a set of viewers sharing common attributes or characteristics such as location, device capabilities or type etc.
Using Prisma, you can define a group of viewers from a given geographical area using FIPS, zip code for instance.
Few examples of audience configuration use cases:
- Sim-subs in Canada: In Canada, viewers are grouped by means of FIPS. Depending on the broadcast programming, those viewers may switch from the Canadian to American content based on their geographical area.
- Mobile blackout: an operator may have negotiated the right to distribute to main screen, but the same content or program may not be allowed for mobile devices.
- Sport blackout: in the US, the area surrounding the stadium undergoes blackout.
When the ingested schedule does not target a particular audience, a default audience element will be created, representing everybody (Audience: All for instance).
To configure the Audience element, follow these steps:
-
Click the Audiences tab.
-
Click the Add button to add an audience resource.
-
Enter and/or select the appropriate value for each parameter:
Parameter Description Audience ID Depending on the audience, different syntax are recommended:
- Location type of audience: for audiences describing a geographical area by means of zipcode, FIPS etc. we recommend the following ID URI syntax:/{content_Provider_name}/audience/location/{location_name}.
-Device type of audience: for audiences describing device (such as mobile for instance), we recommend the following ID URI syntax:/{content_Provider_name}/audience/device/{device_name}
- Nested audiences: for nested (combined) audiences combining a location and device-based audience, we recommend the following ID URI syntax:/{content_Provider_name}/audience/{location_name}.{device_name}Alternative ID Alternative identifier that may be used to support correlation with other identification schemes.
Example: use of DOI for Digital Object Identifier.Description Short description of the audience. Metadata Additional metadata may be added, in text or XML format. Match Possible values:
- ALL: all elements of the audience or nested audiences shall evaluate to true.
- ANY: At least one element of the audience or nested audiences shall evaluate to true.
- NONE: None of the audience or nested audience’s element evaluate to true.Embedded audiences An audience can be created from individual audience (so-called nested audience). You can create for instance a geo-based audience, another one for mobile, and combined those two audiences to create a mobile audience on a given geographical area. Condition Configure audience elements (manually or from a pre-defined list) and value using SCTE-224 audience xsd. 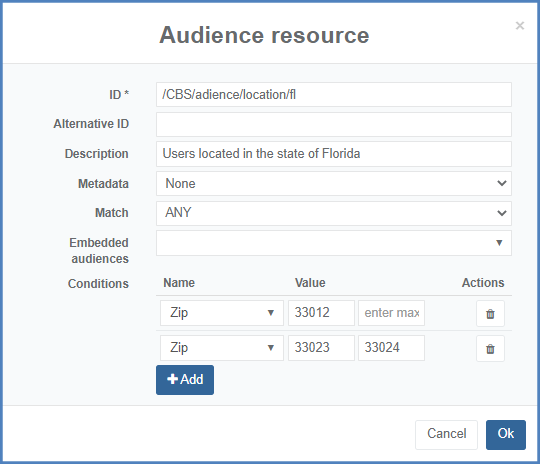 Partial geographical location audience (Florida)
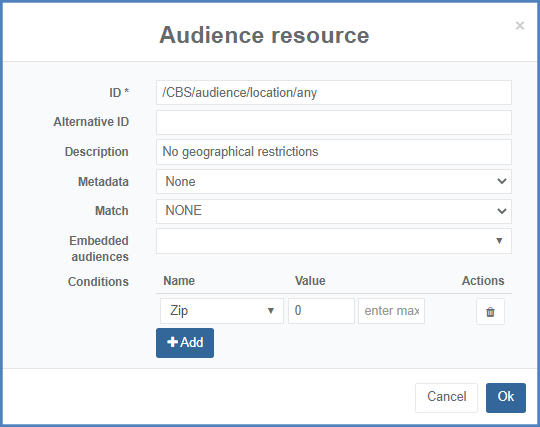 Users anywhere audience
 -
Click Ok to validate. The audience is added to the list of audiences.
Configure a Viewing Policy
In SCTE-224 standard, a viewing policy defines one or more action against a given audience. An audience can be an individual element, or combined audience.
A viewing policy element may describe for instance:
- A blackout
- An alternate content switching (program substitution, regional switch-over)
- An opportunity for linear ad replacement, Dynamic ad insertion
- ...
To configure a Viewing policy, follow these steps:
-
Click the Viewing policies tab.
-
Click the Add button to add a viewing policy element
-
Enter and/or select the appropriate value for each parameter:
Parameter Description ID Viewing policy ID expressed as a URI. We recommend the following syntax: /{content_Provider_name}/viewingpolicy/{audience_name}/{viewingpolicy_name}Alternative ID (optional) Alternative identifier that may be used to support correlation with other identification schemes. Example: use of DOI for Digital Object Identifier. Description Short description of the viewing policy. Metadata (optional) Additional metadata may be added, in text or XML format. Audience Select the audience element you want to configure one or more actions against (drop down list allowing a single select). Actions Select an action from the given list (under Name) and provide a value. Custom action can also be configured.
The value for blackout comes from the SCTE-224 Action XSD using the following value for content: "urn:scte:224:action:blackout". For alternate content switching, a source ID is generally provided.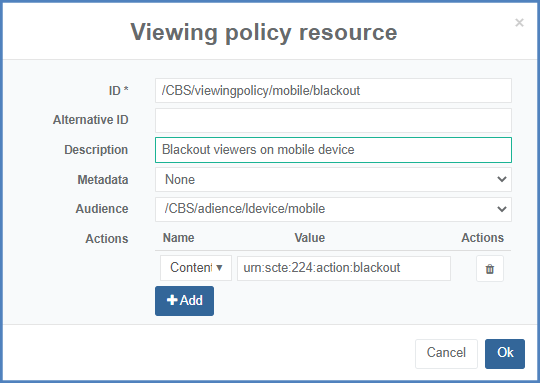 Blackout viewing policy configuration
 -
Click Ok to validate. The viewing policy is added to the list of viewing policies.
Configure a Policy
A Policy element is a collection of one or more Viewing Policy elements. It defines a set of one or more actions against a defined set of audiences.
To configure a Policy element, follow these steps:
-
Click the Policies tab.
-
Click the Add button to add a policy element.
-
Enter and/or select the appropriate value for each parameter:
Parameter Description ID Policy ID expressed as a URL. We recommend the following syntax: /{content_Provider_name}/policy/{audience}/{policy_name}
Example:/CBS/media/KCBS-TVAlternative ID (optional) Alternative identifier that may be used to support correlation with other identification schemes. Example: use of DOI for Digital Object Identifier. Description Short description of the policy. Metadata (optional) Additional metadata may be added, in text or XML format. Viewing policies Select one or more viewing policies. Upon selection, a tree describing how the policy is structured will appear, as shown in the figure below. 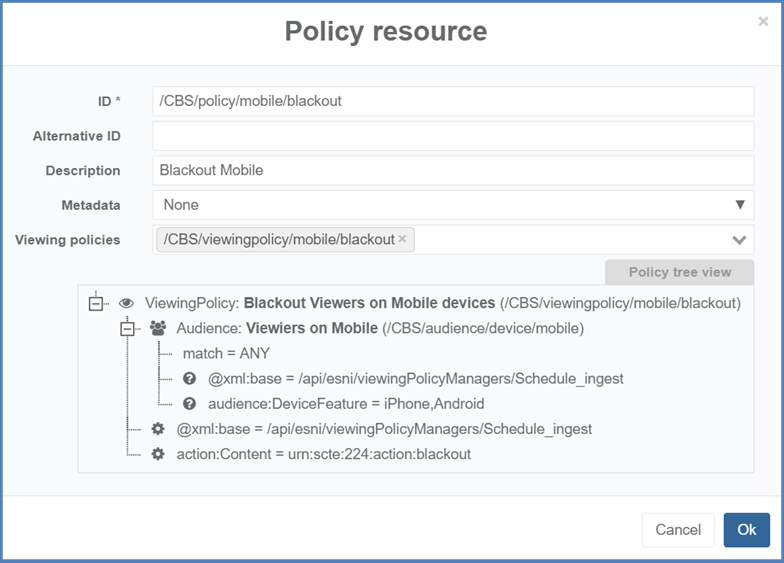 Policy configuration
 -
Click Ok to validate. The policy is added to the list of policies.
Configure a MediaPoint
Scheduled airing program, program blackout etc. will usually be described by two MediaPoint elements (one for the start, and one for the end) or by one MediaPoint element with a given policy duration. Policy with Apply and Remove elements will exist when there is a change in the live channel (Media).
Application of a policy can be time-based (based on @matchTime or @effective/@expires attribute) and/or based on in-band signaling (@matchSignal) using SCTE-35. To summarize, a media point in SCTE-224 describes what happens at a given time.
For instance: a blackout from 10am to 12am at a given day on a given channel will be represented by either:
- One MediaPoint element with a policy describing a blackout action with a duration
- Two MediaPoint elements with a policy (with apply and remove elements)
MediaPoint elements can be created:
- automatically based on ingested schedule (see following sections)
- or manually when the above (SCTE-224 configuration) has been done
To manually create MediaPoint elements, proceed as follows:
-
MediaPoint are created from the SCTE 224 timeline: access the time using the button:
-
either when configuring your viewing policy manager service:
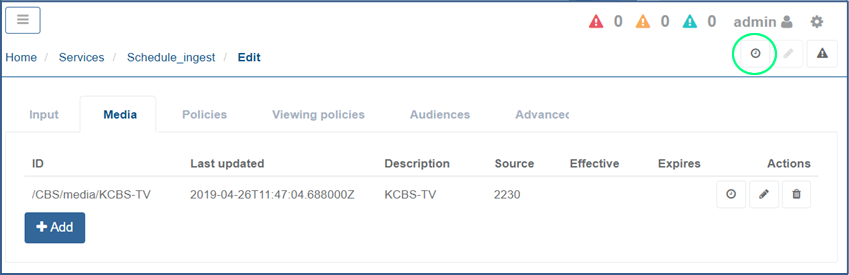 Access SCTE 224 events timeline from service configuration
 -
or from the list of configured services:
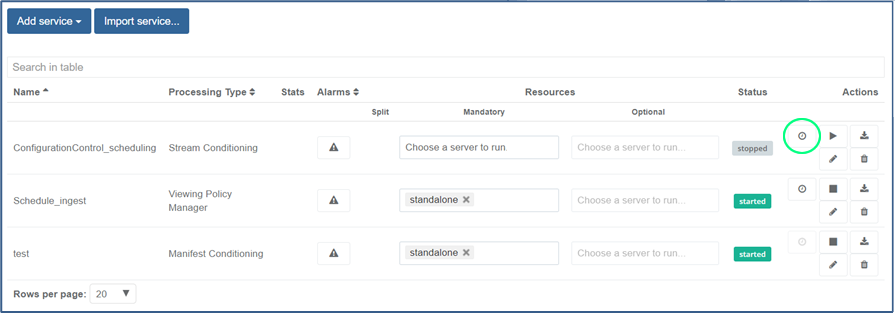 Access SCTE 224 events timeline from list of configured services
-
-
By default, no Media is selected. Click the Media field, and select the Media element/live channel you want to create a MediaPoint to.

-
On the left-hand side, click the Add MediaPoint button.
-
Enter and/or select the appropriate value for each parameter:
Parameter Description ID MediaPoint ID expressed as a URI. We recommend the following syntax: /{content_Provider_name}/media/{Media_name}/program/{secheduled-airing-id}/[start/stop]/{content_Provider_name}/media/{Media_name}/residentAlternative ID (optional) Alternative identifier that may be used to support correlation with other identification schemes. Example: use of DOI for Digital Object Identifier. Description Short description of the MediaPoint. Metadata (optional) Additional metadata may be added, in text or XML format. Effective Date and time when the media point can start being evaluated. It usually corresponds to match time minus a certain duration. Expires Date and time when the media point can stop being considered. It usually corresponds to match time to which a certain duration is added (like few minutes for instance). Expected duration Expected duration of the MediaPoint if known. -
Three tabs must be configured, providing details on the scheduling conditions (time-based and or in-band), as well as the policy application or removal.
-
Click the Match time tab.
Parameter Description Match time Date and time the media point will be evaluated (can be for instance the time at which a blackout shall start).
This parameter corresponds to @matchTime attribute from the media point in the SCTE-224 XML structure.Match offset This field is only relevant for VOD or time-shifted content and shall be left blank. 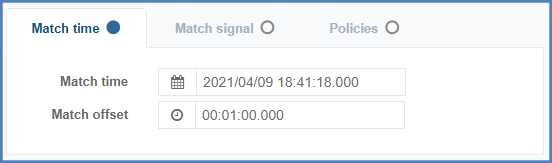 Match time attribute configuration
 -
Click the Match signal tab.
Match Signal tab (and underlying parameters) corresponds to the @matchSignal attribute of the media point.
-
Enter and/or select the appropriate value for each parameter:
Parameter Description Match Select one of the following:
- ALL: all asserts evaluate to true.
- NONE: none of the asset evaluate to true.
- ANY: at least one asset evaluates to trueSource Identifies which source the SCTE-35 shall be matched against. This field can be left blank as we recommend using Media/@source instead. Signal tolerance A duration that is added to match time attribute. In the event the match signal is not found the media point will be activate at match time + signal duration. Reusable Allows re-using above configured asserts. Asserts Specifies where the SCTE-35 XML description is placed, using XPath 2.0 assertion.
Example:/SpliceInfoSection/SegmentationDescriptor[@segmentationTypeId = 16]/ SegmentationUpid[@segmentationUpidType = 1 and contains(text(),'JUS5108')]
Note: One or more asserts can be configured using the Add button.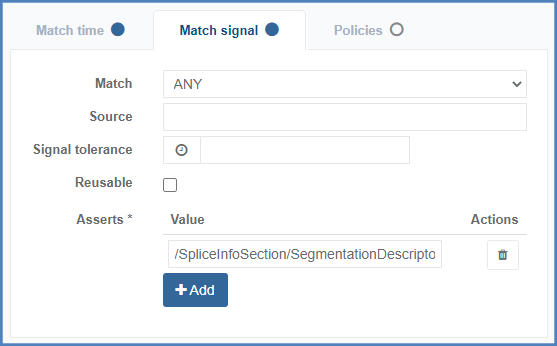 Media point @matchSignal configuration
 -
Click the Policies tab: at this level, you define which policy shall be applied (Apply section) or removed (Remove section).
Policies tab corresponds to the Apply or Remove section of the SCTE-224 media point.
-
-
Click the Add button.
-
Enter and/or select the appropriate value for each parameter:
Parameter Description Policy Select the Policy you want to apply or remove. Duration If the event consists of a mediapoint start with a duration, configure the duration. If the event is made of two mediapoints, this field must be left empty. Priority Priority of the policy in case of policy overlap. Leave blank if a single policy is configured. -
Click Ok to validate.
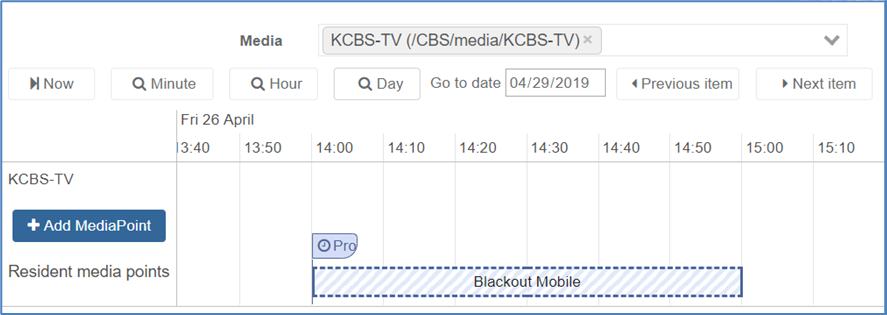 SCTE 224 timeline with mediapoint
Application of SCTE 224 events via mediapoint can be coupled with in-band signaling (SCTE-35) using assets (XPATH 2.0 assertions). For instance, you can apply/remove a policy based on the reception of an SCTE-35 trigger. When this trigger is detected, and within the desired time boundaries, the policy will be applied or removed.
If the match signal attribute is configured, the policy will be applied/removed even if the SCTE-35 trigger has not been detected.