.CSV file ingest
Prisma supports ingest of .CVS files to schedule events either time-based and/or signal-based (SCTE-35 matching). This import type is useful for simple operations when no standard-based ingest (like SCTE-224, ESNI-I02, CCMS etc.) is available.
.CSV files are organized in lines, with a header row to identify the column. Each line contains a list of column-value, comma-separated. MediaKind .CSV files provides a flexible way to provision events.
A description of the different column options is available in the table below:
| Parameter | Description |
|---|---|
| Provider ID | Optional - This field is used to identify the content provider. Example: FOX |
| Media ID | Mandatory – this field is used to identify the Media like the channel name. |
| Delay | Mandatory (if Date/Time and Time Zone are not set) - configured in HH:MM:SS. The time of the event application will be defined as: time when the schedule was loaded + the delay configured. |
| Date | Mandatory (if Delay is not set) – Date when the event occurs, expressed in Year-Month-Day (YYYY-MM-DD). Example: 2020-09-15 (15th of September, 2020). |
| Time | Mandatory (if Delay is not set) – Time when the event occurs, expressed in Hours:Minutes:Seconds (HH:MM:SS). Example: 03:25:45 |
| Time Zone | Mandatory (if Delay is not set) – Time Zone when the event occurs expressed in positive or negative Hours:Minutes. Example: +02:00 |
| Audience | Optional – audience linked to the event. When omitted, a default “all” audience is created. |
| Action | Optional – specify the name of the action. When translated in SCTE-224, this allows specifying the name of the action in the viewing policy. - If Break ID and Position fields are configured, default value will be: action:Capture.- If Break ID and Position are not set, default value will be: action:Content. |
| Value | Optional – Value associated with Action field. Few examples: - When associated with action:Content, this is usually the ID to which the encoder or TS process switches to (blackout, blackout.jpg …)- When associated with action:Capture, this is usually the creative file name the encoder will be in charge of splicing. |
| Policy | Optional – Specifies the Policy the event will take into consideration (as part of the Media Point within <Apply> section). This implies the policy already exists. Note: When this field is left blank, the policy will be automatically created by Prisma. |
| Duration | Mandatory (if Policy is set), Optional otherwise – Duration of the event expressed in HH:MM:SS. Example: 00:30:00 (30 minutes event) |
| Break ID | Optional – Break ID is to be used when managing linear ad replacement. Lines containing the same Break ID value will be considered as belonging to the same ad break. |
| Position | Optional – Position is to be used when managing linear ad replacement (in conjunction with Break ID). Position allows for specifying explicitly the position of an ad spot (creative) within a given ad break (identified using Break ID). |
| Description | Optional - Description of the event (text) |
| MatchSignal | Optional - This field defines the SCTE-35 matching criteria. Example: /SpliceInsert/[@spliceEventId=24];/SpliceInsert/[@spliceEventId=25](which conditions the application of the event to SCTE-35 triggers which splice event ID is equal to 24 or 25 in this example). |
For clarity purposes, few .CSV file examples are given below.
Example#1 – Switch to blackout (using delay mode)
Provider ID,Media ID,Delay,Date,Time,Time Zone,Description,Audience,Action,Value,Duration,MatchSignal
myProvider,Channel1,00:02:00,,,,"Blackout program A",,,blackout-slate,00:10:00,
myProvider,Channel2,01:30:00,,,,"Blackout program B",,,blackout-slate,00:30:00,"/SpliceInsert/[@spliceEventId=24]"
In the above example, we are configuring two blackouts over two distinct channels (“Channel1” and “Channel2”), belonging to the same content provider (“myProvider”):
- Blackout “Channel1” using blackout-slate, at loading time + 2 minutes, during 10 minutes.
- Blackout “Channel2” using blackout-slate, at loading time + 1H30, during 30 minutes. Condition on SCTE-35 matching criteria applies.
Example#2 – Switch to blackout (using time mode – removing unnecessary fields)
Provider ID,Media ID,Date,Time,Time Zone,Value,Duration
myProvider,Channel,2020-09-15,08:30:00,+02:00,blackout-slate,00:10:00,
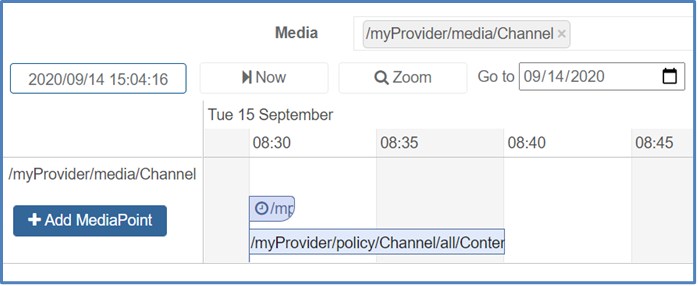
In this example, we have simplified the lines by only mentioning the necessary fields. We have specified a blackout for “Channel”, at defined date and time.
Example#3 – Linear ad replacement
Provider ID,Media ID,Date,Time,Time Zone,Description,Break ID,Position,Value,Duration
myProvider,Channel,2020-09-15,10:15:00,+02:00,Ad Break1,1,1,ad1-1.ts,00:00:30
myProvider,Channel,2020-09-15,10:15:30,+02:00,Ad Break1,1,2,ad2-1.ts,00:00:30
myProvider,Channel,2020-09-15,10:16:00,+02:00,Ad Break1,1,3,ad3-1.ts,00:45:00
myProvider,Channel,2020-09-15,12:10:00,+02:00,Ad Break2,2,3,ad1-2.ts,00:00:40
myProvider,Channel,2020-09-15,12:11:40,+02:00,Ad Break2,2,2,ad2-2.ts,00:00:30
myProvider,Channel,2020-09-15,12:12:10,+02:00,Ad Break2,2,1,ad3-2.ts,00:45:00
In this example, two ad breaks are configured over “Channel”:
- One starting at 10:15: made of ad1-1.ts, ad1-2.ts and ad3-1.ts.
- Another one starting at 12:10:00, with break position being adjusted while managing the schedule.
SCTE-35 conditions may be specified here since linear ad replacement is usually signal-based. That being said, we can also configure SCTE-35 matching criteria when configuring a Stream Conditioning service.
Once the .CSV schedule is loaded, the corresponding Stream Conditioning service can be configured to leverage ingested schedule (normalized in SCTE-224) and map this schedule to ESAM-based controls for instance.
Import a .CSV file
To configure .CSV import, follow these steps:
-
Add a Viewing Policy Manager service.
-
Configure a name.
-
In the Input tab, select CSV as Import type.
-
Click Save and exit to save and finalize your service configuration and go back to the Services page.
-
Assign a server to run your service.
-
To load your .CSV file, click in the top right corner then click the Import CSV File button.

-
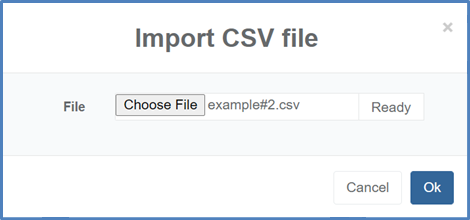
Select your .CSV file then click Ok to validate.

Events will be displayed on the timeline, normalized using SCTE-224 format.
