Configure metadata encoding
Before you start: ensure you have defined metadata encoding parameters (see Configure in-band metadata input stream or Configure out-of-band metadata input stream).
-
From the Encoding tab, go to the Metadata encoding section.
-
Metadata created from the Input tab has been already automatically created. You can click to edit an existing one or click Add to create a new metadata encoding configuration. The Encoded metadata selection window displays.
-
Select the Codec to define how metadata is processed.
Metadata input type Possible values for Codec SCTE-35
SCTE-35 OOB
CuetonesPass-through or Conditioning
- Select Pass-through to forward SCTE-35 information in dedicated output metadata track without video conditioning. For Automation (), metadata must be Pass-through.
- Conditioning allows video stream conditioning and lets you define a POIS server. It can also be used in Blackout.AIT
EBIF
EISSPass-through SMPTE-2038 Pass-through, Timecode ID3, or Tissot clock metadata ID3
In Pass-through mode, you can specify the Max Bitrate on output. If the bitrate target is exceeded, an alarm is raised.
The Tissot metadata present in the SMPTE-2038 stream contains several game metadata (shot clock, scores, team names,…) sent individually in distinct PES packets. To ensure that the Tissot metadata is available for the clients/players, Live Encoder carries them into one ID3 stream (see Convert SMPTE 2038 to ID3). -
For SMPTE-2038 input metadata, if you selected Timecode ID3, or Tissot clock metadata ID3 codec, specific parameters need to be completed.
-
If metadata is set to Conditioning, and if you want to define a POIS server, tick the Use POIS checkbox then set the appropriate value for each POIS parameter.
-
If metadata is set to Conditioning with a POIS server, and if you want to adjust the PTS to ensure that the SCTE-35 marker is equal to the PTS of the corresponding video frame, tick the PTS insertion compensation checkbox.
-
If metadata is set to Conditioning and if you want the encoder to retrieve the conditioning status after a failover thus ensuring internal POIS resiliency, tick the Recover conditioning state if failover checkbox.
-
Click OK to validate.
-
Click Save and continue or Save and exit to save your changes.
-
You can specify the conditioned metadata in the video stream parameters.
-
You can add the conditioned metadata in the output stream.
Convert SMPTE 2038 to ID3
MediaKind Live Encoder ingests and converts SMPTE-2038 to provide data downstream based on the incoming time sources.
To ensure that metadata is available for the clients/players, the Live Encoder carries them into ID3 streams. Two types of data can be extracted from SMPTE-2038 and carried into ID3 streams:
- Tissot metadata: the Tissot metadata in SMPTE-2038 stream contains several game metadata (shot clock, scores, Team names, etc) sent individually in distinct PES packets.
- Timecode information: there are multiple sources of time, and the user can configure the type of timecode to use (LTC, VITC1 or VITC2). The timecodes are embedded in an ID3 stream and identified thanks to MPEG2-TS descriptors. If the input source does not have valid timing data, the timing information is not present in the ID3 data.
This feature is only available with Internet TV export type.
To convert SMPTE 2038 to ID3, follow these steps:
-
From the Input tab, configure the SMPTE 2038 in-band metadata in the input stream.
-
Go to the Encoding tab and check that Export type is set to Internet TV.
-
Go to the Metadata encoding section to add and configure the subtitle encoding:
-
Click the Add button then set the Codec to Timecode ID3, set Origin to LTC and enter the Period (in ms).

-
Click OK to validate.
-
-
Add the video stream related to the output.
-
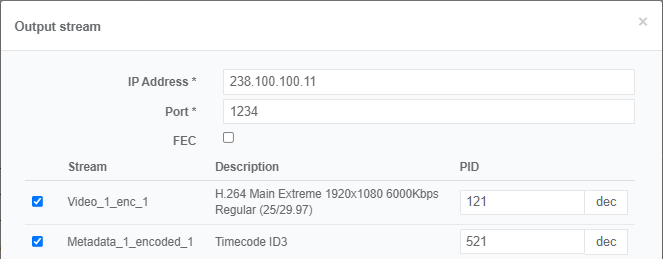
From the Output tab, go o the Output streams section, then click either the Add button (if no stream has been selected) or the edit button, in the Actions column.
-
Select the video stream that you configured in Step #3.

-
Click OK to validate.
You should see the selected streams in the list of output streams.
-
-
Click Save and exit to save and finalize your service configuration and go back to the Services page.
-
Click to display service details and monitor the service:
-
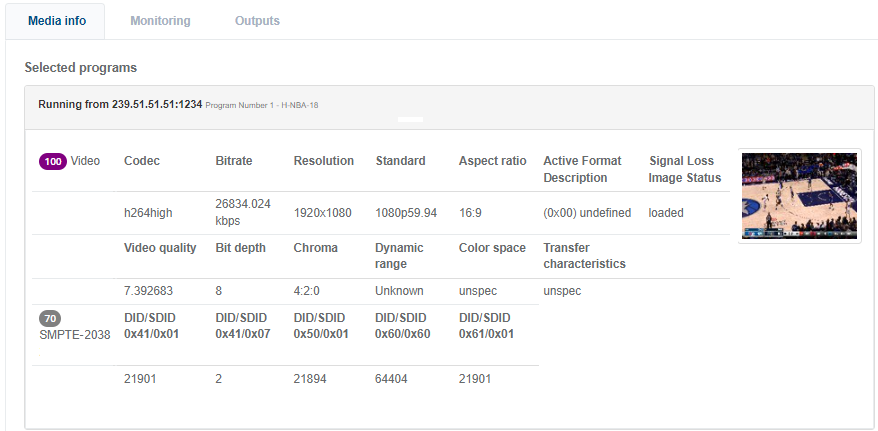
Media info tab shows the SMPTE-30 metadata at input.

-
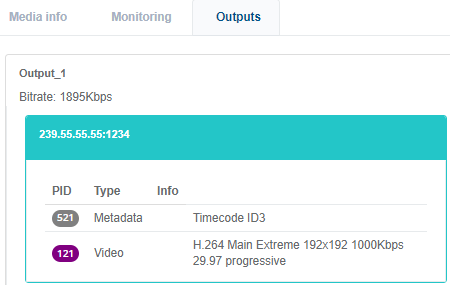
Output tab shows ID-3 metadata at output.

-